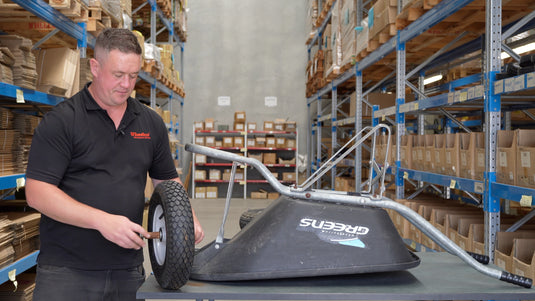
Over time, even the most durable wheelbarrows will need maintenance to keep them working optimally. One of the most common repairs is replacing the wheel, which can wear out or get damaged after years of heavy use. Whether you're a weekend gardener or a daily construction worker, knowing how to replace a wheelbarrow wheel is essential. In this guide, Wheelco's expert, Joel, takes you through the process step-by-step, so you can get back to work with a fully functional wheelbarrow.
Why Replace Your Wheelbarrow Wheel?
Wheelbarrow wheels undergo substantial wear and tear, especially if used on rough terrain, gravel, or heavy loads. Replacing the wheel not only restores functionality but also improves the balance and ease of use. A new wheel can prevent strain on your back and reduce the risk of tipping when carrying heavy items. Plus, by maintaining your equipment, you’re saving money in the long run by avoiding full replacements.
Tools You'll Need
Before starting, gather all necessary tools. Having these items at hand makes the process smoother and helps avoid any last-minute scrambling.
- Ratchet or Spanner: Needed to loosen the nuts on the U-bolts that secure the axle.
- Drill or grinder (optional): If your wheelbarrow U-bolts are heavily rusted, a drill or grinder can speed up the removal process. Don’t worry if you have to cut your rusty U-bolts off - we have new ones!
- WD-40 or Rust Remover: For any stubborn, rusted bolts, a bit of lubricant can work wonders.
- Replacement Wheel: Ensure it’s the right size and type for your specific wheelbarrow model. Check the diameter, width, and axle size to make sure it fits perfectly.
Step 1: Preparing Your Workspace
A well-prepared workspace is crucial to an efficient and safe repair job. Find a flat, stable surface to work on, such as a garage floor, driveway, or workbench area.
- Clear the Area: Remove any unnecessary items and tools that might get in the way. Safety is key here, as working with U-bolts and metal components can pose risks.
- Secure the Wheelbarrow: Prop up the wheelbarrow upside down securely, perhaps against a wall or workbench. If you have a friend available, they can hold it steady for you, but if you’re alone, using bricks or a sturdy object to support it can help.
- Organise Tools Nearby: Make sure your tools are within easy reach to save time and avoid breaking focus. Lay them out in the order you'll need them, starting with the ratchet or spanner.

Step 2: Loosening the U-Bolts
The wheel is typically attached to the wheelbarrow frame by an axle secured with U-bolts. These bolts need to be removed to free the wheel and axle.
- Locate the U-Bolts: Most wheelbarrows have U-bolts holding the axle onto the chassis. These bolts form a “U” shape around the axle and are secured by nuts.
- Loosen Each Nut Gradually: Using your ratchet or spanner, loosen the nuts on each U-bolt. It’s best to alternate between bolts to relieve pressure evenly, preventing the axle from binding or bending.
- Check for Resistance: If you’re finding it hard to turn the nuts, avoid using excessive force. Sometimes rust can make them stick, so consider applying a rust remover or lubricant if they aren’t budging.
Expert Tip: If the nuts are very stubborn, try gently tapping the wrench with a hammer to break the initial resistance. Avoid overdoing it, as too much force can strip the nuts.

Step 3: Removing the Axle and Wheel Assembly
With the U-bolts now loosened, it’s time to remove the axle and wheel. This step is straightforward but requires careful handling to avoid misalignment or damaging the parts.
- Slide Out the Axle: Once the U-bolts are completely loosened, you should be able to slide the axle out. Hold the wheelbarrow steady as you pull out the axle to prevent it from tipping.
- Free the Wheel from the Chassis: Gently lift the wheel from the chassis. Depending on your wheelbarrow design, the wheel might come out easily, or you might need to adjust its angle slightly to slide it free.
Pro Insight: Some wheelbarrows have bushings or washers on either side of the wheel. Make sure to keep track of these and replace them exactly as they were during reassembly.

Step 4: Handling Stubborn or Rusted Bolts
In many cases, wheelbarrow bolts can become rusty over time, making them difficult to remove. Here’s what to do if you encounter stuck or rusted bolts:
- Apply WD-40: Spray the rusted bolts liberally with WD-40 or a similar rust-penetrating oil. Give it a few minutes to work its way into the threads before trying to loosen the nuts again.
- Use a Cutting Tool if Necessary: If the bolts are beyond salvaging, you might need to cut them off. A grinder or hacksaw is ideal, but be cautious and wear protective goggles when using these tools.
- Check for Damage: After removing the bolts, inspect the area for rust damage. If the frame or axle has rust spots, consider using a rust treatment to prevent future issues.
Safety Note: Rusted metal can be sharp. Use gloves when handling old bolts to avoid cuts, and take care when cutting.

Step 5: Installing the New Wheel
Once the old wheel is removed, it’s time to position the new one. This is the part where you need to ensure all components are aligned perfectly to avoid wobbles or uneven wear later on.
- Align the New Wheel with the Axle: Place the new wheel onto the axle and ensure it’s centred and aligned with the chassis. Incorrect alignment can cause balance issues, so take a moment to ensure everything lines up.
- Reinsert the Axle into the Chassis: Carefully guide the axle back into place, making sure it passes through both the wheel and the chassis mounts smoothly. If your wheelbarrow has washers or bushings, don’t forget to position them on either side of the wheel.
- Secure with U-Bolts: Once the axle is in place, reattach the U-bolts around it, securing it firmly to the chassis. Tighten the nuts evenly, alternating between them to apply even pressure. Be careful not to overtighten, as this can cause unnecessary stress on the axle.

Step 6: Final Checks and Adjustments
With the new wheel in place, it’s time to ensure everything is securely fastened and the wheel functions correctly.
- Test the Wheel for Stability: Give the wheel a spin to ensure it rotates smoothly and does not hit the chassis.
- Check the Nuts for Security: Verify that all nuts are secure. Loose nuts can gradually work their way out over time, especially on rough terrain, so ensure they’re tight enough without being overtightened.
Inspect the Wheel’s Position: Confirm that the wheel is centred. A misaligned wheel can cause strain and wear on one side, reducing the lifespan of both the wheel and the axle.

Maintenance Tips to Extend Your Wheelbarrow’s Life
Replacing a wheel is just one part of maintaining a wheelbarrow. Here are a few simple maintenance practices to help extend the life of your equipment:
- Regular Lubrication: A little grease into the bearings of the axle now and then can go a long way in keeping the wheel spinning smoothly and reducing friction wear.
- Avoid Overloading: While it’s tempting to pile on heavy loads, consistently overloading your wheelbarrow will wear down the wheel and strain the frame.
- Store in a Dry Area: Prevent rust by storing your wheelbarrow indoors or in a covered area when not in use. Exposure to moisture accelerates rusting, especially on the wheel and axle.
Replacing your wheelbarrow’s wheel may seem like a small task, but it’s a critical maintenance step that ensures smooth operation and prevents unnecessary strain on the frame and axle. By following this guide, you’ll not only keep your wheelbarrow functioning well, but also gain a deeper understanding of your equipment. If you have any questions or need quality replacement parts, reach out to Wheelco—your one-stop-shop for durable and dependable wheelbarrow wheels.


